Pages


Showing posts with label photography. Show all posts

Tuesday, November 17, 2015

Photo Recipe: Old fashioned Photos

It's time to get back to being creative with photos. :)
Last month, I shot some family photos for an awesome local family.  A few years ago, they were able to purchase the farm that had belonged to the great-grandparents of these four children.  Can you imagine the wonderful history and the new memories that are being made?  It just warms my heart.
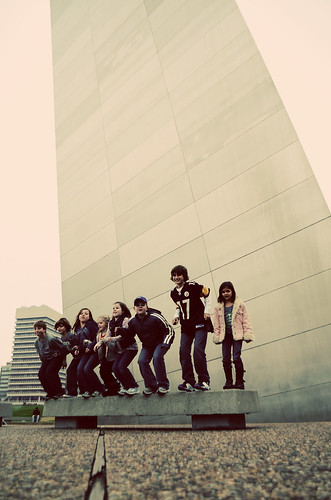
As we wandered around the farm, taking photos, I decided that I wanted to try to capture them on the swing (not original) with very serious expressions, like a photo might have been 80 or 90 years ago.

As you can see, they struggled a bit keeping the serious face.


When I came home and started playing with the photo, I tried to imagine the photos I may have found in an old shoebox at my grandma's house.  The first thing I did was use the layers function in Photoshop to add a black and white layer to convert the photo to black and white.  Nothing fancy, but I did lower the opacity of the black and white layer to 90% to allow just a hint of color through, like the photo has been colorized.


After that, I browsed my Love that Shot Olde World Collection textures.  I was looking for one that would give the photo a yellow tint and maybe make the edges look like they were slightly damaged. I chose a texture called "Sicily" and applied it in "hard light" mode at 40% opacity.

Here's what I ended up with.


I'm pretty pleased with it. I think that I may experiment with a little blur to see if I can make it look more old-fashioned.

If you'd like to try out some of Love that Shot's textures, you can check them out here.

Have fun being creative!


Wednesday, October 1, 2014

Pinecones

Fall in the Midwest: crisp mornings and beautiful trees.  Years ago, we had to take down our poor old oak tree, and all that we have left is a massive white pine that had been planted by the previous owner.  Blah.  Pine needles are not full of fall glory!
After 15 years, I have finally started to pay attention to the cycles of my pine tree.  Every year it loses some, but not all, of its needles.  And some years it produces a few pine cones, some years it seems there are none at all.  
This year is going to be an exception.  The top branches are struggling under the weight of  all of those pine cones.  Only a few pine cones have made their way to the ground so far.  There will be many many more where this came from.  Let me know if you need any.  ;)
I went out in the evening to take photos of the pine cone.  The first thing that I did was purposely underexpose the image, by two full stops.  I wanted the photo to look like reality, not how the camera thought it should look.


I love a lot of bokeh, so this was shot at f/2.0, 1/20, ISO 400, 35 mm.  In an ideal world, I would have increased the ISO for a faster shutter speed, but this was shot with my old camera and I don't like to push it.

I transferred the photo to my computer and took a look.  I was pretty happy with it, but in the digital age, there's no such thing as leaving well enough alone, so I started editing.

The first thing that I did was a slight levels adjustment.  I made the photo just a little darker to reflect the actual light.  And then, because I had missed the warmth of the sunset, I tried to add some warmth with one of Love that Shot's glows:  "Golden Glow Top." I applied it in soft light mode at 50%.


Next I wanted to try out a little texture.  "Fire" from the Simplicity Collection is my go-to, so I made myself try something different.  I chose " Woodsman" from the Fairytale Collection.  I applied it in Soft Light mode at 50% and then added a layer mask to remove just a little of the texture from the pine cone.  I used a soft brush at 50% to wipe away just a little texture.


It's so much fun to play.  You can check out Love that Shot's Photo Veils and Textures here

Monday, June 23, 2014

Photo Recipe: Salvaging a crummy shot

Last Saturday I got up bright and early (for me) to cheer on a friend who was completing her first triathlon.  We drove out along some back country roads and parked and waited for her to come by on her bike.  We nearly missed her the first time and then had some time to kill before she came back by on the return trip.  The girls were a little bored, so they hopped in the back of another parent's truck to wait.  I looked at them sitting there and thought it would make a great photo of rural America.  I tried to snap a couple before they saw me (I prefer natural photos to those with typical tween girls poses) but I failed.
In fact, when I got home and looked at the photo, I pretty much hated it.
But I wanted to love it.  I really really wanted it to look like I had it in my head.  But it was kind of awful.  Rather than just deleting it, I decided to play around.


After looking at it a little more, and realizing that it would have been 1000 times better if all four girls had been looking off into the distance, I decided to treat it like an old-fashioned photo.  You know those ones where no one is really looking at the camera, someone is grouchy, but it was all people had back in the day because film was expensive and photos were rare?
So, I converted it to black and white using a layer.  I played around with the different options and chose "High Contrast Red."  And then I decided I wanted a hint of color, so I set that layer at 75% opacity.


I liked the way it no longer looked like a bunch of girls squinting in the early morning sunlight, but I wanted to make it look grainy and old and well-worn, so I chose Calais from Love That Shot's Old World Collection.  I added it at 75% opacity in overlay mode.


And because I am never satisfied and like big changes, I added one more layer for more oldness (is that a word?) and drama.  I chose Sicily and added it at 45% opacity in linear burn mode.


It's not perfect, but I like how the sky looks moody, just like my daughter's face.  If I edited it again, I might go ahead and remove all color from the photo.  But that's the fun of digital photography, isn't it?  You can just play and play.


If you have any thoughts, I'd love to hear them.
~Shannon

Tuesday, March 25, 2014

Photo Recipe: Using Textures to disguise a background

I am attempting my 4th Project 365 (I made it about 75% through the first one, completed a second and then let's not talk about the third time.)
Some days, I am inspired. Other days, I look around my house for something-- anything-- to shoot. This was an "other" day. An, "Oh, crud, it's time for bed and I didn't take a photo today." I looked at my dining room table, covered in the paraphernalia that broadcasts, "Two very busy kids live here" and saw my son's new baseball glove. I took one shot, didn't like it, re-positioned the glove and ended up with this:
 I liked it, but then again, I like photos that document my kids' lives. What I didn't like was the warmth of the glove against the cool white window frame, green curtains and that chair on the right.  I went to my favorite textures from Love that Shot, the Old World Collection, and chose "Madrid."
I have a penchant for the dramatic, so even though I toyed with taking the opacity down a notch, I ended up keeping it at 100%, soft light. I love the brick texture on the left and how it made the photo seem more artistic.
 

 I decided to apply a layer mask, though, and remove the warmth off of the baseball a bit.


Finally, I added one last texture from the Old World Collection, "Salerno."  I applied it at 50%, soft light, to give the photo a little more vignette and to draw focus to that ball and glove.
  I really liked the way that the photo went from being a snapshot in my dining room to something a little more artistic. The warm background isn't as much of a distraction from the glove and ball.
If I can do it, with no formal training, you can too! Misti and Michelle at Love that Shot have taught me all that I know. If only they could end this long, drawn-out winter so we can play some ball!


Tuesday, December 10, 2013

Photo Recipe: Winterizing a Photo

We got a puppy yesterday.  We've had cats for all 17 years of our marriage and while I love animals, I love cats for their lack of neediness. (Read: we can be gone for hours with no worries.)  But when my in-laws' dog had seven puppies in September, I knew we were toast.  How could we not take on of Bella's puppies?
Rue joined our family yesterday.  Boo and I went on a shopping spree at PetSmart last week and decided that she needed a winter coat.  She is a short-haired dog, after all and and it's supposed to be one doozy of a winter here in Illinois.  When my daughter got home from school, we dressed her up to go outside and of course, I had to take photos.
{Nikon D7000 | 55-300mm lens @ 85mm | f/5.6 | 1/125s | ISO 1000}

This is what I started with:


I'm not one for posing (and 10-week-old puppies and 11-year-old girls feel the same way) so we took a bunch and this one was by far my favorite.  I first adjusted the levels to get the black of Rue's fur a little "juicier." Then I decided the whites weren't white enough.  I went to Love That Shot's Simplicity Photo Veil Collection to see what I could do.  I chose Chamomile an applied it at 25% in overlay mode.  I was pretty happy with the result.  Rue's black was blacker and her whites were definitely brighter.


I am never happy with just one adjustment and I wanted a little more vignette, so I went back to the Simplicity Collection and added the Fairy's Frock Veil. I made sure to choose a veil in the cool range and with the purple-tint of this one, I thought it might be perfect.  I added it at 50%  in overlay mode.


I liked it more, but wasn't quite satisfied, so I added a hue/saturation layer and decreased the saturation to -25 to take a little of the color out of my daughter's hat and coat.  And then I discovered one more veil to really make things look ice-cold:  Vanilla Twilight.  I added this at 50% in soft light.


I really liked the end result.  I think the photo looks plenty chilly now!   If you enjoy simple ways to play with your photos, check out what they have at Love that Shot.  Misti and Michelle will take care of you!


Friday, November 29, 2013

Photo Recipe: My Moody Winter Sky

I was was so proud of myself for keeping up with my thankful posts even as I struggled because I didn't want it to turn into an inventory of the reasons my life is awesome (I didn't want it to feel braggy.)
So, one co-old morning, when I opened all of the shades completely to let the sun shine in and warm the house (total opposite from a typical summer day,) I realized what was what I was thankful for that day: the warmth of the winter sun.  I went out on my front porch, in my pajamas, and tried to get a photo of the winter sky.  I wanted leafless tree tops and that cold blue sky and that quality of the sun that just hollers "It's winter!"
Now, my house is across the street from the Junior High School where my son is an eighth grader.  I did not take the time to play with a lot of settings because I didn't want his buddies to look out the window and see crazy Mrs. K on her hands and knees taking pictures of the sun.  They all know the camera is attached to my hip, but still...
So, I came inside, loaded the photos and this is what I ended up with:

Nov recipe before

Bleh.  I like the silhouette of the trees, and the sky definitely doesn't look summery, but I just didn't love it at all.

Three days after this, we had horrific storms (I live about 9 miles from Washington, IL) and all I could think about was what a moody, fickle sky we have.  With that in mind, I decided to aggressively edit the photo to make it moody.

I am an experimenter and I picked some different textures from the Love that Shot Collections to see what they would do with my photo.  I started with "Wicked" from the Fairytale collection.  It has a nice midnight-blue feel.  At first, I had hoped it would give me a little blue in the sky, but that's not what happened.  But I loved the way it looked:

Nov recipe step 1

I next decided that I wanted a little more color variation, and more texture (remember, I am not subtle) so I chose a texture called "Mauna" from the Kalani Collection.  I loved the colors it added to the photo around the sun:

Nov recipe step 2

Finally, I decided to completely embrace the dark, foreboding feel that this photo was taking on.  I went to the Olde World collection (my favorite of all of the collections) and chose a texture called "Calais" for its dark vignette and ancient feel.  It reminds me of old parchment that has had ink spilled on the edges.

After I added that, one, here was the finished product:

Nov recipe step 3

In review, I added Wicked from the Fairytale Collection (overlay, 75%) then "Mauna" from the Kalani Collection (overlay, 75%) and finally "Calais" from the Olde World collection (overlay, 75%.)  Here is the comparison.

2013_11_141

I like how my winter sky now looks like a creepy full-moon Halloween night!  I didn't end up with what I had intended, but sometimes that's just how life is.

If you'd like to learn more about Love That Shot's Photo Veils and Textures, just click here! Experiment and enjoy!

Sunday, November 10, 2013

Thankful. November 7.

Today I am thankful for people who are willing to spend time wandering around and photographing random things with me.  I think of it as experimenting, and it wouldn't be nearly as much fun without others joining me.  Plus I would really feel like a doofus if I was crawling around cemeteries all by myself.
Added bonus:  it's fascinating to see how two people can see them same thing in entirely different ways.
Posted by Picasa

Monday, January 2, 2012

2011 Favorites

I had a hard time choosing my favorite photos from 2011.  I started to go through all of the photos on my hard drive, then I realized that would take a month of Sundays, so I just took my favorites from my Project 365.   
Without further ado, here are my favorite photos from 2011.

Here is JJ, just after midnight on January 1, 2011.  The lighting isn't great, the photo is a little noisy, but I just plain old like it.

Day 9

I took this one of my son, just after I got my D7000.  It was dark so I cranked up the ISO and didn't care about the noise because I love action shots.  I was so glad I did because I am in love with this shot.  I entered it in one the The Pioneer Woman's contest and she chose it for one of the groups.  It wasn't a finalist, but that doesn't matter to me.  It also happens to be my son's favorite photo of the year.  By the way, the ball did not hit him.

 Day 127: Leap

I love my cats.  Poor Einstein was left alone after we had to put our other two cats to sleep within five months of each other.  We adopted Chester and you can see just how Einstein felt about that at first.  I like to imagine he is looking at me, saying, "Seriously?"

Day 139: Tolerance

We took our kids to Riviera Maya this year.  It was their first time in the ocean.  We snorkeled every day.  I couldn't justify the underwater housing for my D7000, so I took a chance on a Dicapac.  It's a Ziploc Baggie on steroids, with an opening for the lens.  My little Canon Powershot did a great job.  The only issue was that I had NO idea where I was aiming.

Day 215:  FISH!

Here is my daughter, heading to her first softball tournament.  I love her experssion and I think that she has the most beautiful eyes. 

Day 275: Game Face

In November, we played hooky from school and took the kids to St. Louis.  These kids grew up together in playgroup, from the time my daughter was 6 months old.  We were so excited to go to the Arch and then it was foggy.  Total bummer.  We had lots of fun anyway.

Day 333-Reunion


I totally fell in love with this car.  It was parked at one of my son's baseball games.  It was an exercise in composition as there was an UGLY chain link fence off to the left and lots of cars parked around it.

Day 184:  Vintage Car

This was photo 365 of my Project 365 and I love love love it.  We went out to dinner for my birthday and then ate so much that we decided to walk around the outdoor mall.  All of the Christmas lights were up and they were just gorgeous.  And, of course, I go NOWHERE without my camera, so while my family shopped, I played with bokeh.
Day 365- Bokeh fun

Tuesday, January 25, 2011

Early Photography Success

I have always loved photography, but for the longest time, it was just point, shoot and hope to get lucky. It wasn't until after my sister's wedding, two and a half years ago, that I started to think about deliberately doing things to make photos more interesting.
My sister's wedding photographer was awesome. There were so many fantastic shots that I wanted to get married all over again and have her photographer take my photos. My husband isn't on board, even though I do want to marry him again.
Anyway, my point is that while we were getting ready, the photographer took pictures of Keebles, my daughter, sitting on the floor, admiring her flower girl shoes. In the first one, the focus fell on her fancy shoes, and her awesome hair was slightly out of focus. In the second one, the focus was on her hair, and the fancy shoes were slightly out of focus.
Holy cats, it was an epiphany! You can do that? Choose for one thing to be in focus while the other one is not? Why did I not know this before?
Fast forward to this: my first attempt with blurring my background. Yes, I wanted Keebles to be out-of-focus. I thought it showed what she might just look like to that cicada.
On a side note, the last time I had Keebles get real close to a big bug like this ended in disaster. We were at my grandma's farm (like we are in this photo) and there was a HUGE praying mantis on the side of my grandma's house. Keebles didn't want to get close to it, but me, being the good mom that I am, encouraged her to. And the giant praying mantis jumped on her face. Screaming and tears ensued. So, I am grateful that she was willing to get this close to the cicada.
Posted by Picasa

Tuesday, October 5, 2010

5th Grade Boys and Cameras

Today, my son went of a field trip to Springfield, Illinois. The 5th graders visited Lincoln's Tomb, the Lincoln Homestead, The Capitol Building, had lunch at the Governer's mansion with our state rep, Keith Sommers, and finally visited the Lincoln Museum. (I highly recommend it if you haven't been.)

I was a little heartbroken that I didn't get to go (serious photo ops, people!) and since I couldn't go, I twisted poor little KJ's arm until he agreed to take my point and shoot. I hoped that by giving him the camera and the freedom to shoot what he wanted, I would end up with some precious memories. I remember BEGGING my mom to take the camera with me, and I'd get 15 exposures with that Kodak Disk. And have to wait for-ev-er for processing. Painful


Controlling Mom Alert!!! Before he left, I had to set the camera to a mode in which the flash was OFF. I've become a bit of a flash snob in the past few months. Down with flash!


was not disappointed. The kid came home with over 250 shots. Some of them were of the backs of people's heads and his thumb, but all in all, I had a ball looking at them. It was so much fun to see what he thought was important. And to see the 30+ self-portraits he took because he "got bored by the old dudes talking."


My point? Take pictures. Let your kids take pictures, even if they are of Abe Lincoln's outhouse. This is your one chance to record your life, their lives. My husband always makes fun of me and wonders who is going to want all these damn pictures when we are gone. I don't care. I want to have them when I am a 97-year-old-widow, living with my sister, 23 cats and room devoted entirely to pens.

If you want help or inspiration, check this out! 31 days to a better photo. It's fantastic! http://my3boybarians.com/2010/08/31-days/